✨ Universal Local HTTPS & Root CA Manager
AnyCert Banner Logo

一鍵建立內網信任 HTTPS
徹底消除瀏覽器「不安全」警告
One-Click Local HTTPS Proxy
Zero Browser Warnings Guaranteed

專為內網開發、自架服務(NAS、HomeLab、PVE、Microservices)設計。自動簽發 10 年 Root CA 與 825 天伺服器憑證,Nginx 一鍵反代,全自動導入用戶端信任。 Automated 10-year local Root CA issuance & Nginx SSL wrapping for internal services, NAS, HomeLab, Proxmox VE, and microservices. Eliminate 'Not Secure' warnings across all client devices.

100% 純內網/離線運作100% Offline / Pure LAN
零 PowerShell /DISM 依賴Zero PowerShell Dependency
支援多 IP SAN (Tailscale/VPN)Multi-IP SAN (Tailscale/VPN)
免密碼 HTTP 自動下載Zero-Password HTTP Distribution
用戶端 OS 智慧自動偵測Client OS Auto-Detection
跨平台 (Windows/Linux/macOS)Cross-Platform Support
Features

強大且極致簡潔的核心特色 Powerful & Streamlined Features

無需購買網域名稱、無需外部 DNS 驗證,解決內網連線所有憑證痛點 No domain name required, no cloud dependencies. Fix internal HTTPS warnings effortless

🔐

10 年自簽 Root CA 10-Year Local Root CA

自動產生 RFC 規格完整的 Root CA( critical, CA:true),並簽發 825 天符合現代瀏覽器規範的伺服器憑證。 Generates fully compliant Root CA certificates with 10-year validity and 825-day server certificates compatible with all modern browsers.

Nginx 一鍵 SSL 包裹 Nginx SSL Wrapper

既有 HTTP 服務無需做任何修改!AnyCert 自動為本地連接埠加上 SSL 防護(HTTP Port + 自訂偏移量或 1:1 直通)。 Keep your backend HTTP services running as-is. AnyCert automatically wraps your local ports with Nginx SSL proxies seamlessly.

🌐

多 IP SAN 網段支援 Multi-IP SAN Support

支援實體 LAN IP、FQDN、localhost,並可寫入 Tailscale、ZeroTier 或 VPN 虛擬網段 IP,全通道證書皆安全有效。 Includes local LAN IPs, FQDNs, localhost, and custom Tailscale/VPN IPs into certificate Subject Alternative Names (SAN).

💻

用戶端全自動信任導入 Automated Client Trust

提供 Windows、Linux 與 macOS 專用安裝腳本,一鍵將 CA 匯入系統信任區、Chrome NSSDB 並自動配置 hosts 路由。 Cross-platform installer scripts automatically import Root CA into OS Trust Stores, Chrome NSSDB, and update system hosts files.

🚀

Web 免密碼自動分發首頁 Zero-Password HTTP Distribution

Nginx 預設放行 Port 80 / 443 導覽頁,用戶端打開瀏覽器即可下載腳本與憑證,全自動偵測裝置 OS 呈現專屬下載按鈕。 Integrated Web Landing Page on Port 80/443 allows zero-password downloads for scripts and certificates with automatic client OS detection.

🛡️

零 PowerShell 依賴與零殘留 100% PowerShell-Free

全專案 Windows 腳本採用原生 Batch 與 VBScript 重構,避開 ExecutionPolicy 限制與 CMD 括號 Bug,並支援一鍵完全反安裝 (`-u`)。 Built with pure CMD batch and VBScript, bypassing ExecutionPolicy restrictions. Includes full one-click clean uninstall (`-u`).

Why HTTPS?

🔒 為什麼區域網路 (LAN) 也需要 HTTPS? 🔒 Why Does Local LAN Also Need HTTPS?

除了消除紅色「不安全」警語,更有三大現代 Web API 與資安關鍵因素 Beyond removing browser warning icons, three critical API and security reasons

1. 啟用現代瀏覽器 Web API (Secure Contexts) 1. Modern Web API Access (Secure Contexts)

現代瀏覽器(Chrome, Safari, Edge)規定大量強大 Web API 僅能在 HTTPS 安全上下文(或 localhost)中執行。使用 HTTP 跨裝置連線時將被強行禁用 Browsers strictly disable advanced Web APIs on non-localhost HTTP connections across local devices:

  • 📋 剪貼簿複製 (Clipboard API)Clipboard APIAI 聊天室 (Open WebUI, LLMChat) 「Copy Code」按鈕點擊直接失效!'Copy Code' buttons break in AI chat tools!
  • 🎙️ 麥克風與相機Microphone & Camera語音對話 AI (Speech-to-Text) 無法取得收音權限。Voice AI unable to record microphone audio.
  • 📱 PWA 應用與 Service WorkersPWA & Service Workers無法將自託管 App 安裝至桌面或手機主畫面。Cannot install web apps to home screen.
  • 🔌 硬體互動 (WebBluetooth / USB)WebBluetooth / WebUSBWebBluetooth、WebUSB、Gamepad 硬體限制。Bluetooth and USB hardware API blocked.
🔑

2. 防止內網密碼與 AI Token 被竊聽 2. Prevent Credential & Token Eavesdropping

在公司、學校、共享宿舍或 Wi-Fi 區域網路中,未加密的 HTTP 流量極易被同網路的其他人使用 Wireshark 嗅探工具側錄。AnyCert 的全通道 HTTPS 能有效保護: Unencrypted HTTP traffic in shared LAN or Wi-Fi networks is vulnerable to packet sniffing (Wireshark). AnyCert HTTPS encrypts:

  • 🛡️ 自託管服務的登入帳號與密碼Self-hosted app login passwords
  • 🤖 傳輸中的 OpenAI / Claude API TokensAI API Keys (OpenAI/Claude Tokens)
  • 💬 LLM 聊天隱私與私有資料庫內容LLM chat content and internal DB data
📦

3. 防止檔案下載被 Chrome 攔截封鎖 3. Bypass Insecure Download Blockers

Google Chrome 對普通 HTTP 連線有嚴格的「不安全下載」防護機制。當您從自託管服務下載系統備份檔、AI 模型權重檔或 Log 報表時,瀏覽器會主動將其判定為風險下載並直接攔截封鎖。使用 AnyCert 可獲得完全信任,順暢存檔。 Modern Chrome strictly blocks files downloaded over plain HTTP connections (system backups, AI model weights, log reports). HTTPS ensures smooth, unblocked downloads.

Architecture

連線品質與安全性對比 Before vs. After AnyCert

擺脫明文 HTTP 警語與傳統自簽憑證的紅色報錯畫面 Eliminate plain HTTP warnings and self-signed certificate untrusted red screens

傳統方式 (Plain HTTP / Untrusted Cert) Traditional / Plain HTTP
  • 瀏覽器網址列顯示顯眼紅色「不安全」警語Browser shows prominent red "Not Secure" warning
  • 每次開啟皆需手動點擊「進階 ➔ 繼續前往」Requires manual "Advanced -> Proceed" click every time
  • Chrome M146+ 新版 Root Store 機制會強制阻擋連線Modern Chrome Root Store strictly blocks execution
  • 內網 API、WebSockets 或 PWA 應用因無 HTTPS 而被限制PWA, WebSockets, and Web APIs are restricted
  • 需要手動在每一台電腦配置繁瑣的系統憑證信任Manual complex trust store setup per client
🟢 使用 AnyCert 部署後 (Secure & Trusted) With AnyCert Deployed
  • 🟢 網址列亮起綠色/灰色安全鎖頭 🔒,與權威 CA 無異Address bar displays secure lock 🔒 icon smoothly
  • 🟢 全自動建立 10 年內網信任 Root CA 與 825 天伺服器證書Automatic 10-year Root CA & 825-day server certs
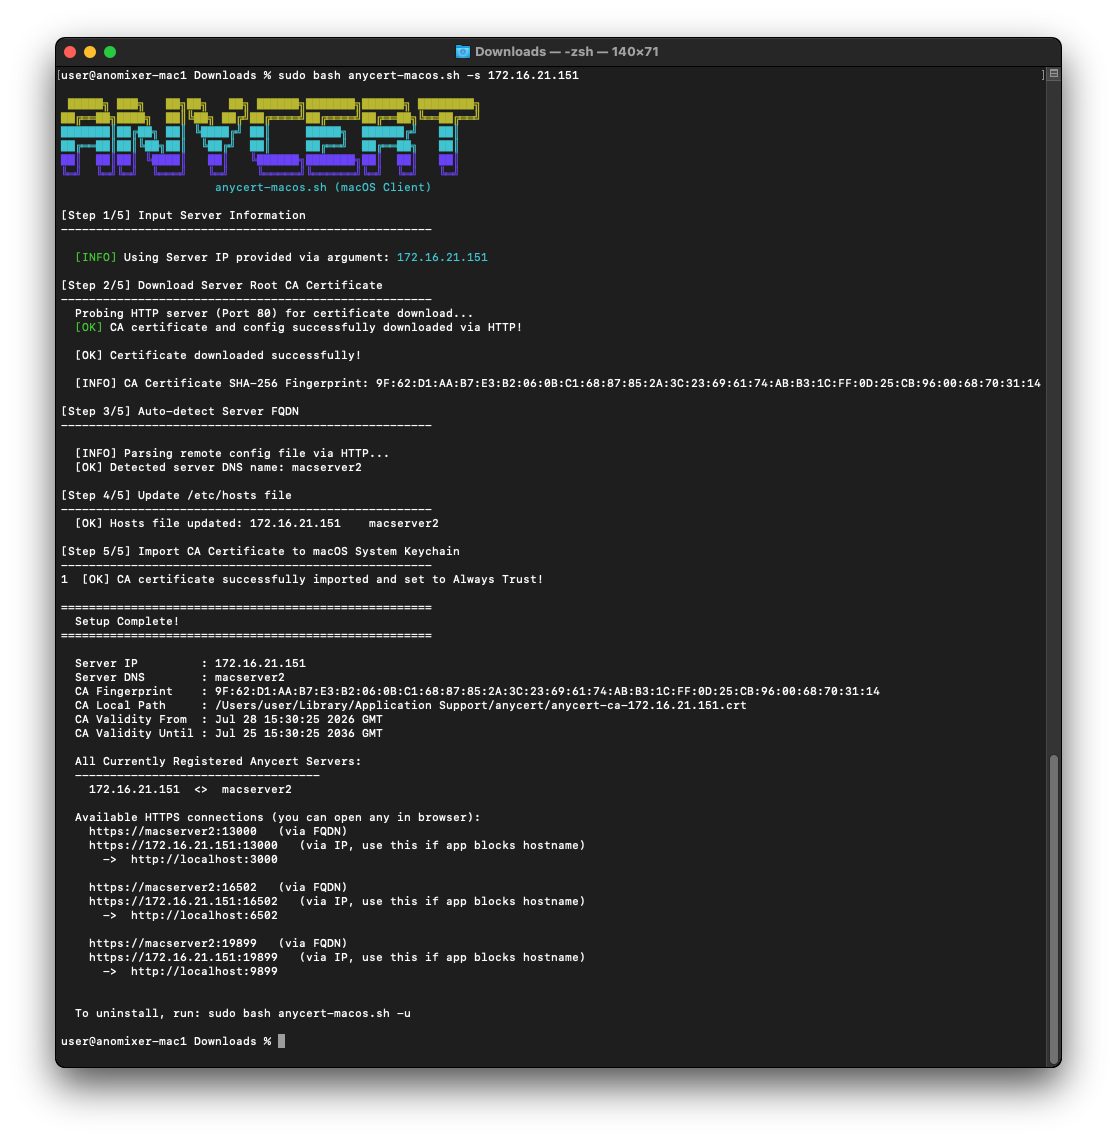
  • 🟢 用戶端執行單行指令即自動完成 CA 信任與 hosts 配置Single command on client sets up trust and hosts file
  • 🟢 支援 FQDN、實體 IP 以及 Tailscale / VPN 虛擬網段存取Supports FQDN, local IP, and Tailscale/VPN IPs
  • 🟢 預設 Web 首頁動態探測 CA 狀態並提示一鍵切換 HTTPSLanding page auto-probes CA status & prompts HTTPS
Comparison

主流內網 HTTPS 解決方案大比拼 Solution Comparison & Trade-offs

比較各類內網 HTTPS 實現方式,為何 AnyCert 是最適合 Homelab 與開發團隊的解答 Comprehensive breakdown of internal HTTPS options and why AnyCert stands out

1. 內網 HTTPS 方案功能矩陣 (Solution Matrix) 1. Internal HTTPS Solution Matrix

比較項目Feature 傳統自簽憑證Untrusted Self-Signed Let's Encrypt + CFLet's Encrypt + Cloudflare Cloudflared / ngrokCloudflared / Tunnel Tailscale HTTPSTailscale HTTPS AnyCert 內網信任AnyCert (Universal)
離線/純內網運作100% Offline / Pure LAN 🟢 是🟢 Yes ❌ 需連網更新憑證❌ Needs Online Renewal ❌ 需連網 Tunnel❌ Needs Online Tunnel ❌ 需連網更新憑證❌ Needs Online Renewal 🟢 100% 離線 / 零外網依賴🟢 100% Offline / Zero Cloud
無需公開 DomainNo Public Domain 🟢 不需要🟢 Not Needed ❌ 需購買公網網域❌ Needs Paid Domain ❌ 需公網網域/配額❌ Needs Domain / Quota ❌ 限制 *.ts.net❌ Restricted to *.ts.net 🟢 不需要 (IP 或 FQDN 皆可)🟢 No (IP or FQDN)
支援直接以 IP 存取Direct IP Access ⚠️ 顯示紅字警告⚠️ Shows Red Warning ❌ 否 (僅限 Domain)❌ No (Domain Only) ❌ 否❌ No ❌ 否❌ No 🟢 支援多 IP SAN 綁定🟢 Multi-IP SAN Support
外網隱私暴露風險Privacy & CT Logs Risk 🟢 無🟢 None ⚠️ 高 (CT Logs 暴露)⚠️ High (CT Logs Public) ⚠️ 中 (流量經過第三方)⚠️ Medium (Third-Party Relay) 🟢 低🟢 Low 🟢 零隱私暴露 / 完全封閉🟢 Zero Privacy Exposure
用戶端維護成本Client Maintenance ❌ 每次到期重新手動匯入❌ Manual Import Every Renewal 🟢 瀏覽器原生信任🟢 Native Browser Trust 🟢 瀏覽器原生信任🟢 Native Browser Trust ❌ 每台需常駐 Tailscale❌ Requires Tailscale App 🟢 10 年一次設定終身免重設🟢 10-Year Set & Forget
費用Cost 免費Free 免費 (3個月重簽)Free (3-Mo Renewal) 免費 / 部分付費Free / Paid Tiers 免費 / 企業收費Free / Paid Tiers 🟢 100% 完全免費 / 開源🟢 100% Free & Open Source

2. AnyCert vs. mkcert 功能比對 (mkcert vs. AnyCert) 2. AnyCert vs. mkcert Feature Breakdown

功能特性Feature mkcertmkcert AnyCert Profile [4] (僅產生)Profile 4 (Generate) AnyCert Profile [3] (自訂路徑)Profile 3 (Custom) AnyCert Profile [1] (Nginx 反代)Profile 1 (Nginx Proxy)
本機開發 HTTPS (localhost)Localhost HTTPS ✅ 是✅ Yes ✅ 是✅ Yes ✅ 是✅ Yes ✅ 是✅ Yes
LAN / IP SAN 支援LAN & IP SAN Support ✅ 是✅ Yes ✅ 是✅ Yes ✅ 是✅ Yes ✅ 是 (支援多 IP)✅ Yes (Multi-IP)
匯入 OS / Chrome NSS 信任區OS & Chrome NSS Trust ✅ 自動✅ Automatic ✅ 搭配用戶端腳本自動✅ Auto via Client Script ✅ 搭配用戶端腳本自動✅ Auto via Client Script ✅ 伺服器/用戶端腳本自動✅ Auto via Server/Client Script
自動複製憑證至服務目錄Auto-Copy Certs to Service ❌ 手動拷貝❌ Manual Copy ❌ 手動拷貝❌ Manual Copy ✅ 自動複製✅ Auto Copy ✅ 自動配置 (Nginx)✅ Auto Config (Nginx)
部署後自動重載服務Auto-Reload Service ❌ 否❌ No ❌ 否❌ No ✅ 可設定 Reload 指令✅ Configurable Reload ✅ 自動 reload Nginx✅ Auto Reload (Nginx)
自動安裝 Nginx SSL 反向代理Auto-Install Nginx Proxy ❌ 否❌ No ❌ 否❌ No ❌ 否❌ No 🟢 全自動下載並安裝 Nginx🟢 Auto Download & Install Nginx
LAN 多裝置 CA 自動分發Auto-Distribute CA to LAN ❌ 手動複製 rootCA.pem❌ Manual Copy rootCA.pem ✅ 用戶端腳本自動分發✅ Auto via Client Script ✅ 用戶端腳本自動分發✅ Auto via Client Script 🟢 Web 免密碼/腳本自動分發🟢 Zero-Password Web / Script
用戶端 hosts 自動寫入Client Hosts Auto-Update ❌ 手動修改❌ Manual Edit ✅ 用戶端腳本自動寫入✅ Auto via Client Script ✅ 用戶端腳本自動寫入✅ Auto via Client Script ✅ 用戶端腳本自動寫入✅ Auto via Client Script
需安裝 Go 執行檔 (binary)Requires Binary Installation ⚠️ 需要安裝 binary⚠️ Requires Binary 🟢 免安裝 (純 Shell/Batch)🟢 No Install (Pure Script) 🟢 免安裝 (純 Shell/Batch)🟢 No Install (Pure Script) 🟢 免安裝 (純 Shell/Batch)🟢 No Install (Pure Script)

3. 設計哲學:Port 偏移 vs. 子網域 (Subdomain) 分流 3. Philosophy: Port Offset vs. Subdomain Routing

比較項目Aspect 方案 A:子網域分流 (走 443 埠)Option A: Subdomains (Port 443) 方案 B:AnyCert Port 偏移 (共用 FQDN)Option B: AnyCert Port Offset
網址外觀URL Style 漂亮,如 https://llmchat.demo.localClean, e.g. https://llmchat.demo.local 帶有埠號,如 https://server.demo.local:13000With port, e.g. https://server.demo.local:13000
新增內網服務時Adding New Services 每台 Client 電腦都要手動改 hosts 檔。每新開一個 Web 服務,全團隊每個人都要改一次 /etc/hosts 新增域名,維護極其繁瑣。Manual hosts file updates per client device for every new service added. High maintenance overhead. Client 電腦終身免修改!所有 Client 只要第一天設定過,往後就能直接存取任何新 Port,零摩擦力!Zero client maintenance forever! Once configured, clients immediately access any new port seamlessly.
憑證管理成本Certificate Management ❌ 必須為每個新子網域簽發新憑證,或被迫維護繁瑣的 Wildcard 泛網域自建憑證。❌ Must issue new certs for every subdomain or maintain complex Wildcard certs. 🛡️ 伺服器憑證只需簽發一次並包含 IP SAN,Nginx 重新 reload 即可,管理成本近乎為零。🛡️ Issue server cert once with IP SANs, reload Nginx, near-zero management cost.
Service Profiles

靈活的五大 Service Profiles 部署模式 Five Flexible Service Profiles

深入了解五大 Profile 的專屬架構流程圖與實際部署範例 Explore dedicated architecture flowcharts and deployment examples for all five profiles

Profile 1

Nginx SSL Proxy (單機反代) Nginx SSL Proxy (Single-Host)

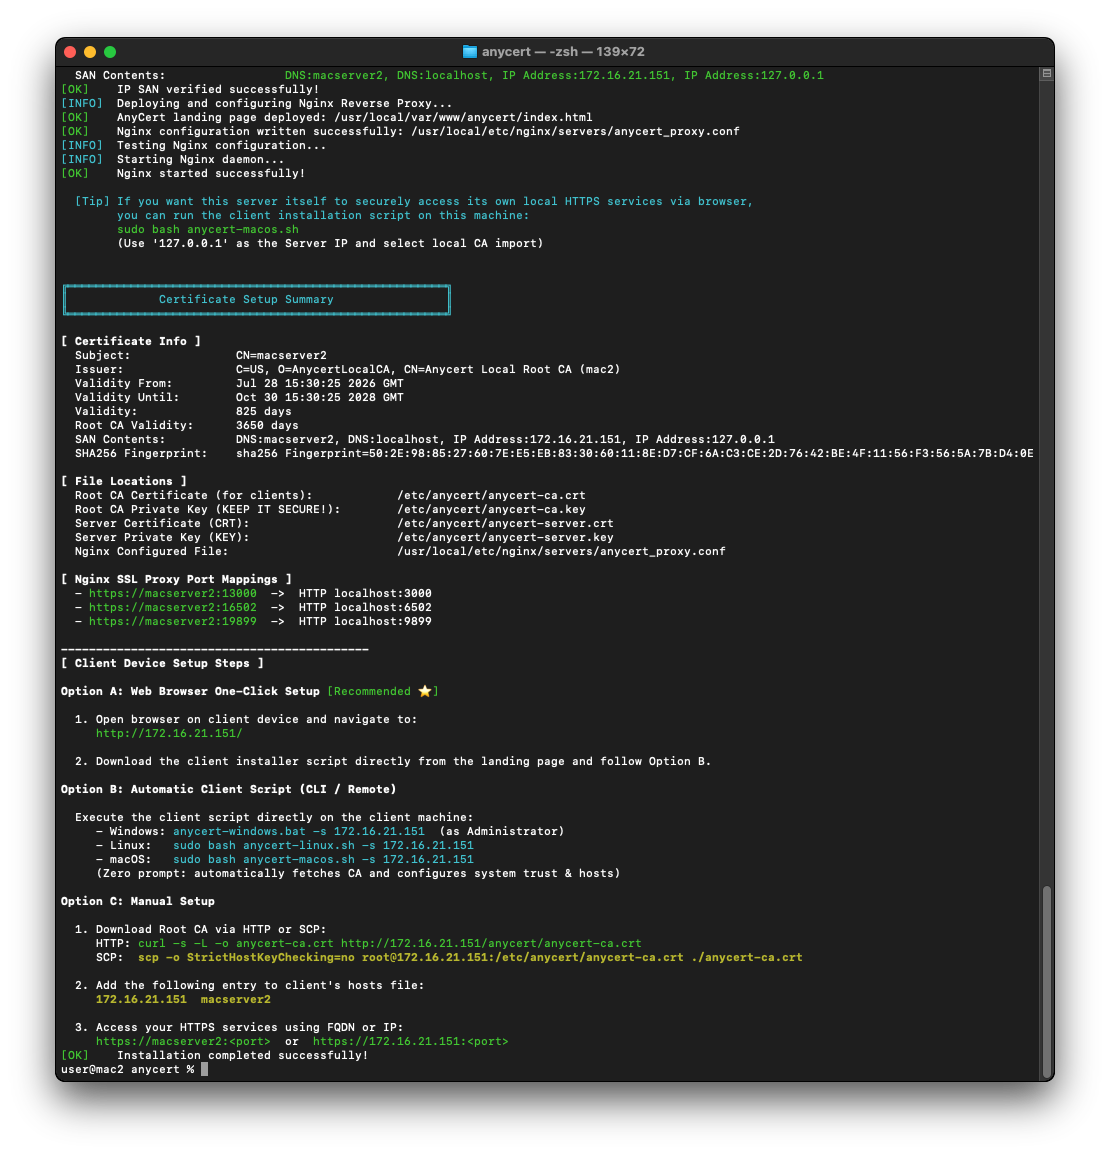
最推薦模式 ⭐:自動掃描本機正在監聽的 HTTP Ports(如 Open-WebUI :3000、Ollama :11434),自動加上 HTTPS SSL 包裹(SSL Port = HTTP Port + 自訂偏移量,預設 +10000)。 Recommended ⭐: Scans local listening HTTP ports and adds HTTPS wrappers automatically on port + offset (default +10000).

Profile 1 運作流程圖 (Single-Host Nginx SSL Proxy Workflow) Profile 1 Single-Host Nginx SSL Proxy Workflow

💻 Client Browser 信任 Root CA Trusted Root CA HTTPS :13000 🔒 🖥️ Server A (Single Host) Local Nginx Proxy Offset: +10000 SSL 協議解密包裹 SSL Decryption HTTP 127.0.0.1 🤖 Open-WebUI http://127.0.0.1:3000 ➔ :13000 🔒 🧠 Ollama API http://127.0.0.1:11434 ➔ :21434 🔒
💡 Profile 1 實際部署範例 (Homelab 本機 AI 服務) Profile 1 Deployment Example (Local AI Stack)
執行 command: sudo bash anycert.shanycert.bat ➔ 選擇 [1] Nginx SSL Proxy Run command: sudo bash anycert.sh or anycert.bat ➔ Select [1] Nginx SSL Proxy

HTTP :3000 (Open-WebUI)https://server.demo.local:13000 🔒
HTTP :11434 (Ollama)https://server.demo.local:21434 🔒

Profile 2
🔀

Nginx SSL Gateway (專用網關) Nginx SSL Gateway (Dedicated)

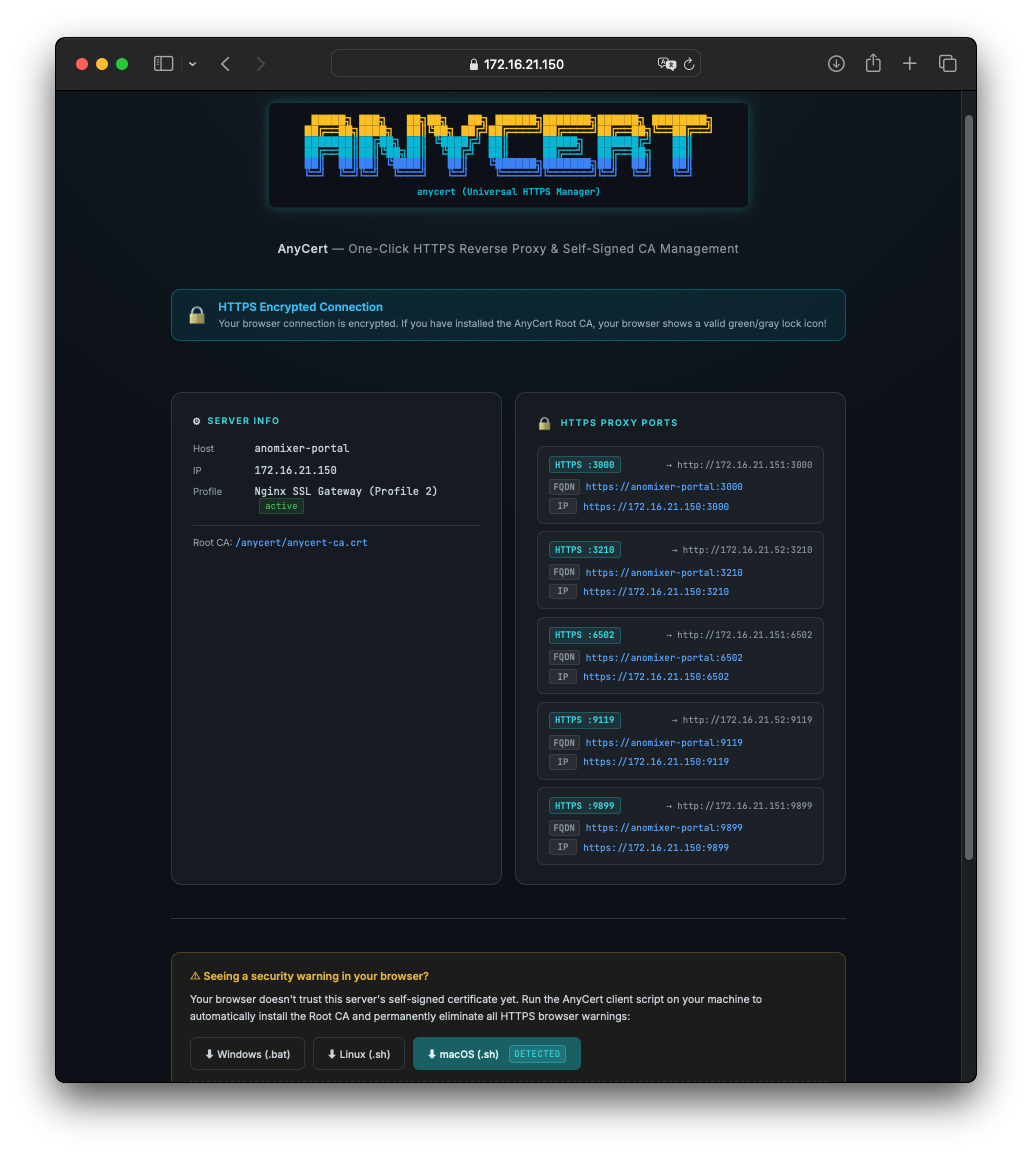
用於獨立網關主機:代理其他遠端內網伺服器的 HTTP 服務,預設 1:1 直通連接埠(如 `HTTPS :6502 -> http://172.16.21.52:6502`)。 Deployed on a gateway server to reverse proxy HTTP services from other backend servers with 1:1 port mapping (offset 0).

Profile 2 運作流程圖 (Dedicated Nginx SSL Gateway Workflow) Profile 2 Dedicated Nginx SSL Gateway Workflow

💻 Client Browser 信任 Root CA Trusted Root CA HTTPS 1:1 Ports 🔒 🌐 Gateway (VM / LXC) 🔀 Edge SSL Gateway Offset: 0 (1:1 Gateway) 跨機內網多伺服器轉發 Multi-Node LAN Relay 🖥️ Server A (NAS) 💾 Synology NAS Server http://172.16.21.50:5000 ➔ :5000 🔒 🖥️ Server B (Apps) 🏠 Home Assistant Hub http://172.16.21.51:8123 ➔ :8123 🔒 🖨️ OctoPrint 3D Printer PC http://172.16.21.51:15000 ➔ :15000 🔒 🖥️ Server C (Dev) 🖥️ Internal Dev Web Server http://172.16.21.53:8080 ➔ :8080 🔒
💡 Profile 2 實際部署範例 (獨立網關代理內網多台 NAS/PC) Profile 2 Deployment Example (Edge Gateway for Multiple PCs & NAS)
執行 command: 選擇 [2] Nginx SSL Gateway ➔ 輸入遠端 IP 與 Port 清單: 172.16.21.50:5000 172.16.21.51:8123 172.16.21.51:15000 172.16.21.53:8080 Run command: Select [2] Nginx SSL Gateway ➔ Enter IP & port list: 172.16.21.50:5000 172.16.21.51:8123 172.16.21.51:15000 172.16.21.53:8080

172.16.21.50:5000 (Synology NAS on Server A)https://gateway.demo.local:5000 🔒
172.16.21.51:8123 (Home Assistant on Server B)https://gateway.demo.local:8123 🔒
172.16.21.51:15000 (3D Printer PC on Server B)https://gateway.demo.local:15000 🔒
172.16.21.53:8080 (Dev Server on Server C)https://gateway.demo.local:8080 🔒

Profile 3
🛠️

Custom Path (自訂路徑部署) Custom Path Deployment

自動將簽發的 CRT / KEY 複製至您指定的服務路徑(如 IIS、既有 Nginx、Apache、Emby、Plex、Docker 等),並可執行自動 Reload 命令。 Deploys generated certs to custom file paths (IIS, Nginx, Apache, Emby, Plex, Docker) with optional automatic reload commands.

Profile 3 運作流程圖 (Custom Path Deployment Workflow) Profile 3 Custom Path Deployment Workflow

🔒 AnyCert Engine 簽發 825 天 SSL 憑證 Issue 825-Day Certs Auto Copy 📁 Target Directory /etc/emby/certs/ server.crt server.key Reload Cmd 🎬 IIS / Docker / Emby docker restart emby HTTPS Trusted 🔒
💡 Profile 3 實際部署範例 (Docker Emby / IIS 伺服器) Profile 3 Deployment Example (Docker / IIS Server)
執行 command: 選擇 [3] Custom Path ➔ 輸入目標路徑與重新載入指令 Run command: Select [3] Custom Path ➔ Enter target directory & reload command

Target Directory: /etc/emby/certs/
Auto Reload Cmd: docker restart emby

Profile 4
📝

Generate Only (僅產生憑證) Generate Only (Manual)

僅於伺服器端產生 Root CA 與伺服器憑證檔案,不自動配置任何反向代理,適合需完全手動設定的進階管理者。 Generates certificate files only without configuring proxy servers. Suitable for manual advanced configurations.

Profile 4 運作流程圖 (Generate Only Workflow) Profile 4 Generate Only Workflow

🔒 AnyCert Engine 產生證書不啟動 Proxy Generate Certs Only Outputs 📝 Raw Cert Files anycert-ca.crt server.crt & server.key Manual Use 🐍 Python / Go / Rust uvicorn main:app Direct SSL Read 🔒
💡 Profile 4 實際部署範例 (Python / Go 原生 HTTPS 服務) Profile 4 Deployment Example (Native App SSL)
執行 command: 選擇 [4] Generate Only ➔ 取得本機憑證檔案 Run command: Select [4] Generate Only ➔ Retrieve local cert files

Outputs: ./certs/server.crt & ./certs/server.key
uvicorn main:app --ssl-keyfile server.key --ssl-certfile server.crt

Profile 5
Proxmox VE

Proxmox VE (PVE 節點支援) Proxmox VE Node Support

僅在 PVE 系統自動顯示!自動替換 `/etc/pve/nodes//pveproxy-ssl.pem` 並安全重啟 pveproxy 服務,讓 PVE Web UI 立刻獲得安全鎖頭。 Auto-detected on PVE systems. Automatically replaces PVE node SSL certs and reloads pveproxy for secure PVE Web UI.

Profile 5 運作流程圖 (Proxmox VE Auto-SSL Workflow) Profile 5 Proxmox VE Auto-SSL Workflow

🔒 AnyCert Engine 自動偵測 PVE 節點 Detect PVE Node Auto Swap 📄 PVE SSL PEM Location /etc/pve/nodes/<node>/ pveproxy-ssl.pem pveproxy reload Proxmox VE Web UI https://pve-node:8006 Web Console Trusted 🔒
💡 Profile 5 實際部署範例 (Proxmox VE Web Console) Profile 5 Deployment Example (Proxmox VE Console)
執行 command: 於 PVE 主機執行 sudo bash anycert.sh ➔ 自動進入 [5] Proxmox VE Run command: Run sudo bash anycert.sh on PVE host ➔ Auto select [5] Proxmox VE

Target File: /etc/pve/nodes/pve1/pveproxy-ssl.pem
PVE Web Console: https://pve1.demo.local:8006 🔒
Compatibility

支援環境與跨平台相容性對比 Platform & OS Compatibility Matrix

AnyCert 已於區域網路實機環境通過完整交叉測試,支援主流 Server 與 Client 作業系統 Cross-platform compatibility tested across real-world LAN Server and Client operating systems

1. 伺服器端部署相容性 (Server Side) 1. Server Side Platform Support

伺服器端平台Server Platform Windows
(Win 10/11/2016+)
Linux
(Ubuntu/Debian)
macOS
(12+ Monterey+)
WSL 2
(Linux Subsystem)
Proxmox VE
(PVE 7 / 8 / 9)
伺服器端腳本Server Script anycert.bat anycert.sh anycert.sh anycert.sh anycert.sh
一鍵安裝部署Installation & Setup ✅ 支援✅ Supported
(Nginx zip 綠色解壓)(Nginx zip extract)
✅ 支援✅ Supported
(apt/dnf/yum)(apt/dnf/yum)
✅ 支援✅ Supported
(Homebrew Nginx)(Homebrew Nginx)
✅ 支援✅ Supported
(附宿主 netsh 指令)(With netsh rules)
✅ 支援✅ Supported
(自動代換 pveproxy)(Auto pveproxy reload)
Server 本機存取Local Browser Access ✅ 一鍵匯入 Trust✅ One-click Trust ✅ 執行客戶端腳本導入✅ Import via Client Script ✅ 執行客戶端腳本導入✅ Import via Client Script ✅ 執行客戶端腳本導入✅ Import via Client Script 不適用 (無 GUI 介面)N/A (Headless)
一鍵反安裝 (`-u`) 支援Clean Uninstall (-u) ✅ 支援 (anycert.bat -u)✅ Supported (anycert.bat -u) ✅ 支援 (sudo bash anycert.sh -u)✅ Supported (sudo bash anycert.sh -u) ✅ 支援 (sudo bash anycert.sh -u)✅ Supported (sudo bash anycert.sh -u) ✅ 支援 (sudo bash anycert.sh -u)✅ Supported (sudo bash anycert.sh -u) ✅ 支援 (sudo bash anycert.sh -u)✅ Supported (sudo bash anycert.sh -u)

2. 用戶端信任導入相容性 (Client Side) 2. Client Side Trust Automation

用戶端特性Client Feature Windows
(Win 10/11/Server)
Linux
(Ubuntu/Debian)
macOS
(12+ Monterey+)
用戶端腳本Client Script anycert-windows.bat anycert-linux.sh anycert-macos.sh
自動匯入系統信任區OS System Trust Store ✅ CertUtil (Root Store)✅ CertUtil (Root Store) ✅ ca-certificates / update-ca-trust✅ ca-certificates / update-ca-trust ✅ security (System Keychain)✅ security (System Keychain)
Chrome M146+ NSSDB 支援Chrome NSSDB Support ✅ Windows System Store✅ Windows System Store ✅ ~/.pki/nssdb & ~/.local/share/pki/nssdb✅ ~/.pki/nssdb & ~/.local/share/pki/nssdb ✅ macOS System Keychain✅ macOS System Keychain
Hosts 檔案自動配置Hosts File Update ✅ 自動寫入 hosts✅ Auto Update hosts ✅ 自動寫入 /etc/hosts✅ Auto Update /etc/hosts ✅ 自動寫入 /etc/hosts✅ Auto Update /etc/hosts
一鍵反安裝 (`-u`) 支援Clean Uninstall (-u) ✅ 支援 (anycert-windows.bat -u)✅ Supported (anycert-windows.bat -u) ✅ 支援 (sudo bash anycert-linux.sh -u)✅ Supported (sudo bash anycert-linux.sh -u) ✅ 支援 (sudo bash anycert-macos.sh -u)✅ Supported (sudo bash anycert-macos.sh -u)
Quick Start

兩步驟,快速完成內網信任部署 Two Steps to Complete Setup

第一步:伺服器端簽發 ➔ 第二步:用戶端一鍵信任 Step 1: Server issuance ➔ Step 2: Client trust import

Step 1 — 伺服器端部署 (Server Setup) Step 1 — Server Setup

Linux / macOS / WSL Server (Bash)
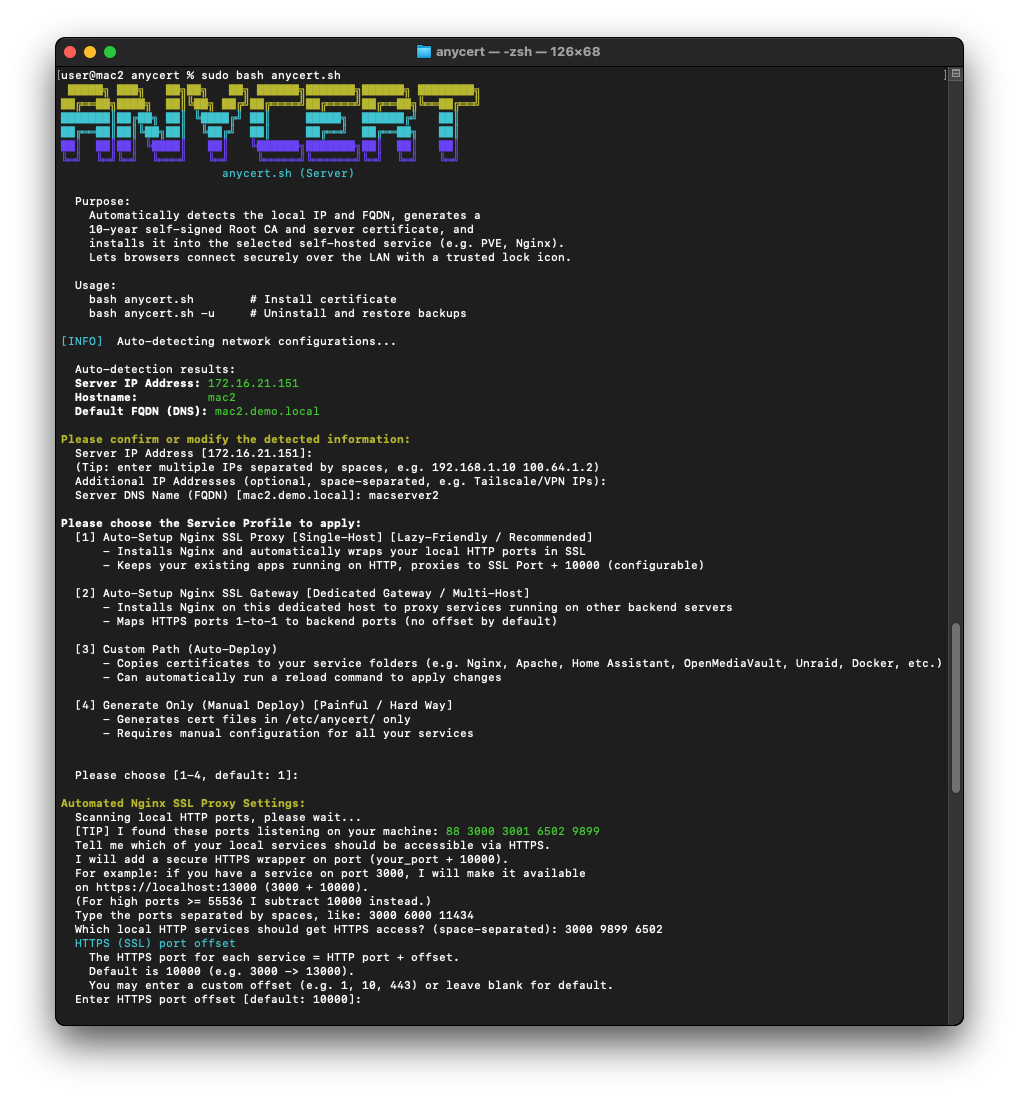
$git clone https://github.com/anomixer/anycert.git
$cd anycert
$sudo bash anycert.sh
# 自動產生 Root CA & 伺服器憑證,選擇 Service Profile 完成 Nginx 反代配置 # Auto-generate Root CA & Server Certs, select Service Profile to configure Nginx proxies

Step 2 — 用戶端信任導入 (Client Trust Setup) Step 2 — Client Trust Setup

Option A: Web Browser One-Click Setup
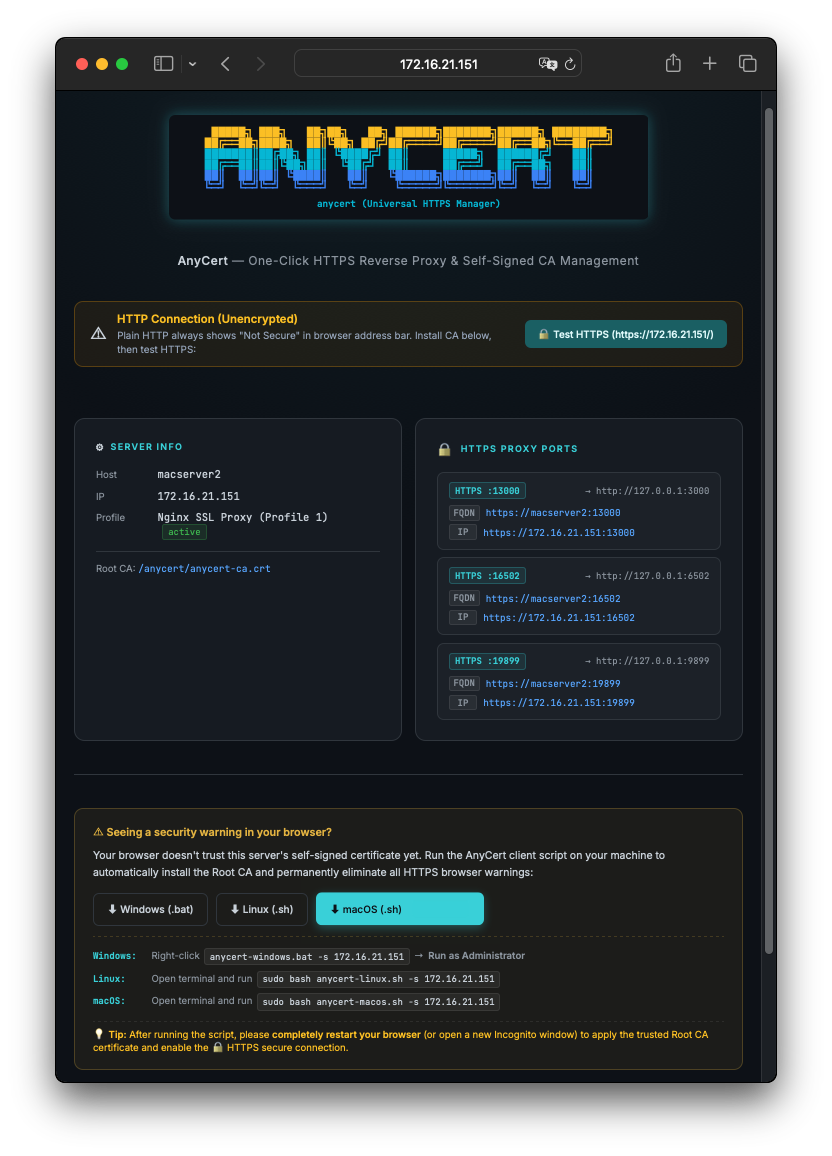
🌐 1. 在用戶端瀏覽器開啟 AnyCert 伺服器首頁: 🌐 1. Open AnyCert server homepage in client browser:
http://<SERVER_IP>/
✨ 2. 頁面會自動偵測您的作業系統 (Windows / Linux / macOS) 並高亮專屬下載按鈕! ✨ 2. Page auto-detects client OS (Windows / Linux / macOS) & highlights matching download!
💡 3. 下載對應檔案後執行,即可一鍵完成 Root CA 信任與 Hosts 配置! 💡 3. Run the downloaded script to complete Root CA trust & hosts config in one click!
Screenshots

實際運作畫面展示 Screenshots Showcase

點擊圖片可放大檢視詳細截圖 Click any screenshot to view full screen image

FAQ

常見問題與疑難排解 Frequently Asked Questions

為什麼執行完用戶端腳本後,連線 HTTP 網址依然顯示「不安全」? Why does plain HTTP still show "Not Secure" after running the client script?
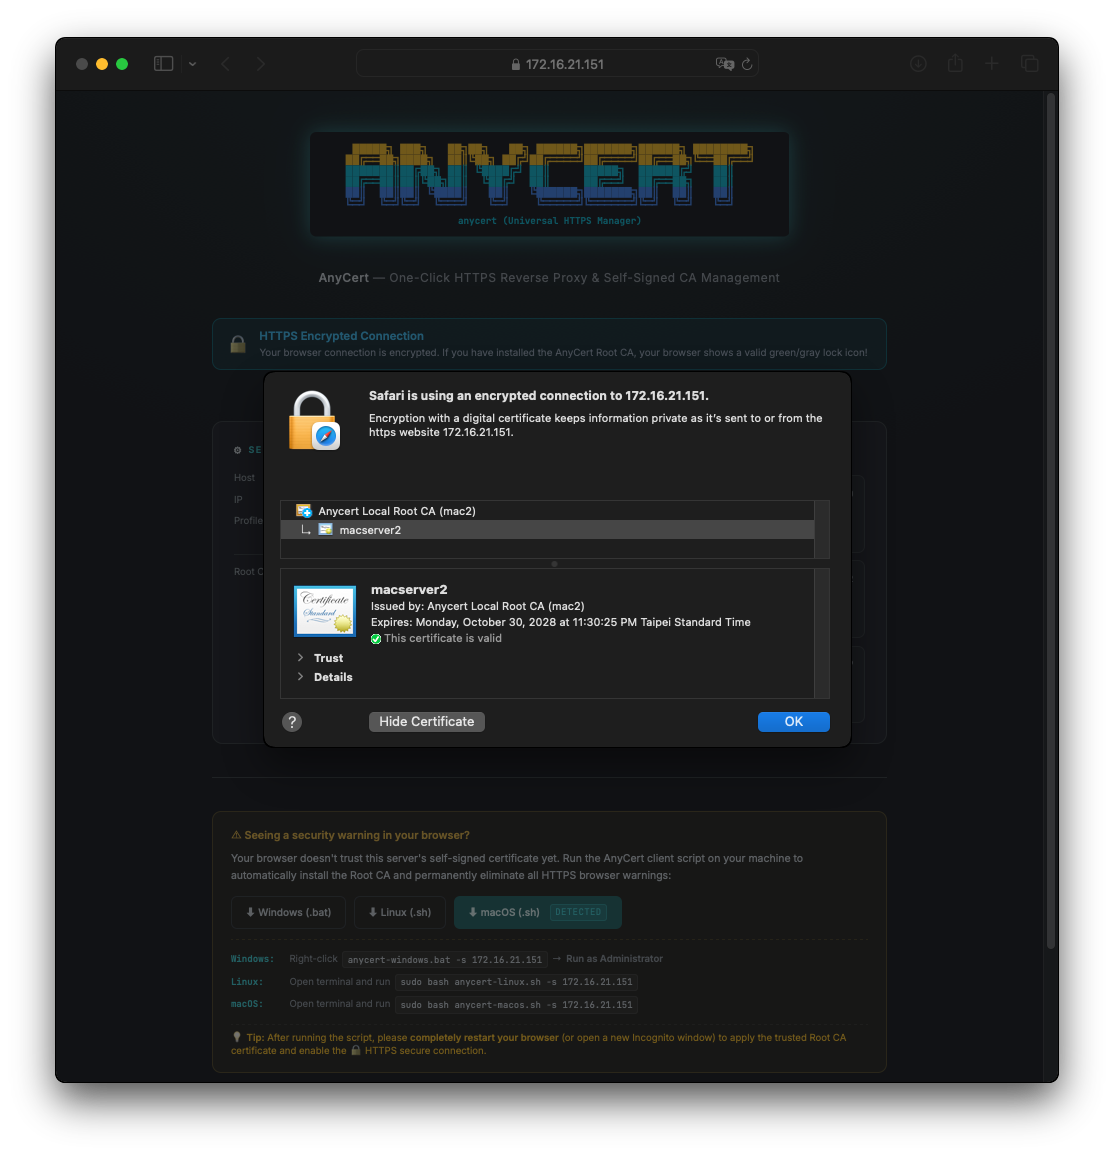
現代瀏覽器(如 Chrome、Edge、Safari)對於明文 `http://` 協定一律會顯示「不安全」字樣。請執行完用戶端腳本後完全關閉並重開瀏覽器,並將網址切換為加密的 https://<SERVER_IP>/ 或代理埠,即可看到亮起綠色/灰色安全鎖頭 🔒! Modern browsers always label plain `http://` connections as "Not Secure". After running the client script, please completely restart your browser and switch to https://<SERVER_IP>/ to view the secure 🔒 lock icon.
AnyCert 需要連接外網或註冊網域名稱 (Domain) 嗎? Does AnyCert require external internet access or a registered domain?
完全不需要! AnyCert 100% 在內網環境完全離線運作,不需要向外部 CA 註冊、不需要公網 Domain,也不需要 Cloudflare API。 100% No! AnyCert operates completely offline in local LANs without external domain registration or cloud dependencies.
支援 Tailscale、ZeroTier 或 VPN 虛擬網段 IP 存取嗎? Does AnyCert support Tailscale, ZeroTier, or VPN IPs?
完全支援! 伺服器端設定時會在第二步提示輸入額外 IP(例如 Tailscale IP),自動寫入憑證的 SAN (Subject Alternative Name) 欄位中,經由虛擬網路連線依然安全有效。 Fully supported! The server script prompts for additional IPs (e.g. Tailscale IPs) during setup and automatically bakes them into the certificate SANs.
如果日後想反安裝 AnyCert,該如何完全乾淨移除? How do I cleanly uninstall AnyCert if needed?
伺服器端執行 `anycert.bat -u` 或 `sudo bash anycert.sh -u` 即可復原 Nginx 設定並清理憑證。用戶端執行 `anycert-windows.bat -u` 即可選擇刪除匯入的 Root CA 信任與 hosts 紀錄。 Run `anycert.bat -u` or `sudo bash anycert.sh -u` on the server to restore Nginx configs. Run `anycert-windows.bat -u` on clients to remove trusted Root CA and hosts entries.
可以在單一一台電腦上完成本地受信設定嗎? Can I set up local certificate trust on a single computer?
完全可以! 請先執行伺服器端腳本(anycert.batanycert.sh),將 IP 設定為本機(127.0.0.1)。若在 Windows 平台上,腳本最後會詢問是否匯入本機信任區(確認後即無需再執行用戶端腳本);若是 Linux / macOS / WSL 平台,請在同一台電腦執行一次對應平台的用戶端腳本即可。 Yes! First run the server script (anycert.bat or anycert.sh) and specify 127.0.0.1 as the IP. On Windows, the installer will ask if you want to import the CA into the local trust store (skipping the need for a client script). On Linux, macOS, or WSL, simply run the corresponding client script once on the same computer.
如果有雙網卡(或虛擬 IP / IP Alias),可以在單機做到 Profile 2 的「1:1 同 Port 轉發」嗎?有哪些避雷重點? Can I achieve 1:1 port forwarding (like Profile 2) on a single host with dual NICs or IP Aliases? What are the key pitfalls?
完全可以!這稱為「單機融合模式 (Fusion Mode)」。透過在同一台主機的網卡上綁定第二個 IP(Secondary IP / IP Alias),即可在單一機器上實現 1:1 同 Port 的 HTTPS 反向代理,無需額外部署 VM 或 LXC 網關!

🔹 架構與運作原理:
  1. 網路卡設定: 網卡綁定主 IP IP-A(例如 192.168.1.100),並新增第二個虛擬 IP IP-B(例如 192.168.1.200)。
  2. 服務監聽與轉發: 後端 Web 服務僅綁定監聽 IP-A:port(或 127.0.0.1:port),而 Nginx 開啟 SSL 並僅監聽 IP-B:port
  3. 流量路由: 存取 https://IP-B:3000/ 🔒 → Nginx 解密 → 轉發至 http://127.0.0.1:3000/ 🔓,成功達成 1:1 Port 不衝突。
🚨 關鍵避雷重點 (Pitfalls to Avoid):
  • 0.0.0.0 綁定衝突 (EADDRINUSE): 許多後端服務與 Docker 容器預設會監聽 0.0.0.0:PORT(綁定所有 IP 介面)。如果後端佔用了 0.0.0.0:3000,Nginx 在 IP-B:3000 啟動時會因埠號衝突而直接崩潰。解決方式: 必須修改後端服務設定或 Docker 埠號映射,明確指定僅監聽 127.0.0.1IP-A
  • IP 資源與雲端環境限制: 內網環境需確保 IP-B 在路由器中已設為靜態或保留;若在雲端主機 (AWS/GCP/Azure),需透過雲端面板申購配發 Secondary Private IP。
  • 重啟持久化: 透過系統指令(如 Linux ip addr add 或 Windows netsh)手動新增的 IP Alias,在重啟後會消失,需寫入系統網路設定檔(如 netplan / Windows Registry)維護持久化。
Yes! This is known as Single-Host Fusion Mode. By binding a secondary IP address (IP Alias / Secondary IP) to your host's network card, you can achieve 1:1 port HTTPS reverse proxying on a single machine without deploying extra VMs or LXC containers!

🔹 Architecture & Workflow:
  1. Network Setup: Assign primary IP-A (e.g. 192.168.1.100) and add a secondary virtual IP-B (e.g. 192.168.1.200) to the network interface.
  2. Service Listening: Configure backend web services to bind strictly on IP-A:port (or 127.0.0.1:port), while Nginx SSL listens on IP-B:port.
  3. Traffic Routing: Requests to https://IP-B:3000/ 🔒 → decrypted by Nginx → forwarded to http://127.0.0.1:3000/ 🔓 with zero port conflicts.
🚨 Critical Pitfalls to Avoid:
  • 0.0.0.0 Binding Collision (EADDRINUSE): Many backend applications and Docker containers default to listening on 0.0.0.0:PORT (all interfaces). If a backend service claims 0.0.0.0:3000, Nginx will fail to start on IP-B:3000 due to port collision. Solution: You must update the backend config or Docker port mapping to bind explicitly to 127.0.0.1 or IP-A.
  • IP Allocation & Cloud Restrictions: On LANs, ensure IP-B is reserved/static on your router. On cloud providers (AWS/GCP/Azure), assign a Secondary Private IP via the cloud management console.
  • Reboot Persistence: Secondary IPs added via temporary CLI tools (e.g. Linux ip addr add or Windows netsh) will disappear upon reboot. Save them to system network configs (e.g. netplan, systemd-networkd, or Windows Registry) to survive reboots.
如果內網已經有軟路由(如 OpenWrt / pfSense / iStoreOS)可以簽發憑證,為什麼還需要 AnyCert? If I already have a Soft Router (e.g. OpenWrt, pfSense, OPNSense) that issues certificates, why use AnyCert?
兩者的適用情境與自動化維度完全不同! 軟路由內建的 ACME 套件僅解決「公網 Domain 的憑證簽發」,而 AnyCert 提供了完整的「離線零 Domain 簽發 + Nginx 自動反代 + 全平台客戶端一鍵自動信任」端到端解決方案:

  • 100% 離線 & 零 Domain 依賴: 軟路由 ACME 必須申請公網網域名稱 (Domain) 並設定 Cloudflare 等外網 DNS API 驗證;AnyCert 可在無網際網路的純內網、IP (如 192.168.x.x) 或 Tailscale 虛擬網段直接簽發。
  • 跨平台客戶端一鍵自動信任: 軟路由完全無法幫客戶端電腦自動匯入憑證;AnyCert 提供 anycert-windows.bat / anycert-linux.sh / anycert-macos.sh 一鍵腳本,自動遠端下載 CA、自動導入系統與 Chrome 信任庫並配置 hosts。
  • 零網路拓撲變更: 無需購買或更換軟路由硬體,在任何既有主機(Windows / Linux / macOS / PVE)上執行即可即刻生效!
Their target scenarios and automation scope are completely different! Router ACME tools usually only cover certificate generation for public domains, whereas AnyCert provides a complete end-to-end solution: 100% Offline & Domain-free Issuance + Automated Nginx Proxy + One-click Cross-Platform Client Trust Automation:

  • 100% Offline & Zero Domain Dependencies: Router ACME requires a registered public domain name and external DNS API credentials (e.g. Cloudflare). AnyCert works offline in isolated LANs, raw IPs (e.g. 192.168.x.x), or Tailscale VPN networks.
  • One-Click Automated Client Trust: Soft Routers cannot automate client-side trust installation. AnyCert provides one-click client scripts (anycert-windows.bat, anycert-linux.sh, anycert-macos.sh) that automatically fetch the CA, install it into system & Chrome trust stores, and update local hosts.
  • Zero Network Topology Changes: No need to buy or configure soft router hardware—simply run AnyCert on any existing host (Windows, Linux, macOS, or Proxmox VE).
行動裝置(iOS / Android 手機和平板)可以使用嗎?該如何匯入憑證? Can I use AnyCert on mobile devices (iOS / Android)? How do I install the certificate?
完全可以!行動裝置只需下載並導入 anycert-ca.crt 即可亮起安全鎖頭 🔒!

💡 手機連線關鍵說明(IP 網址 vs FQDN 域名):
  • 預設推薦使用 IP 網址存取 (https://<SERVER_IP>:xxxx): 由於手機無 Root 權限無法修訂本機 hosts 檔,AnyCert 簽發時已將伺服器實體 IP 與 Tailscale IP 寫入憑證 SAN 欄位中,因此無需修改 hosts,手機直接打 IP 網址即可安全連線!
  • 若欲在手機使用 FQDN 域名 (https://<FQDN>:xxxx): 需在內網路由器或 DNS 伺服器(如 AdGuard Home、Pi-hole、OpenWrt)自訂 Local DNS A 紀錄指到伺服器 IP。
📱 iOS / iPadOS 安裝步驟:
  1. 用 Safari 開啟 http://<SERVER_IP>/(AnyCert 預設 Web 首頁),點擊下載 anycert-ca.crt
  2. 前往 iOS 「設定」→「已下載描述檔」→ 點擊「安裝」
  3. 關鍵步驟: 前往 iOS 「設定」→「一般」→「關於本機」→ 底部「憑證信任設定」→ 開啟 AnyCert Root CA 的「完全信任」開關。
🤖 Android 安裝步驟:
  1. 用 Chrome 開啟 http://<SERVER_IP>/ 下載 anycert-ca.crt
  2. 前往 Android 「設定」→「安全性與隱私權」→「更多安全性設定」→「加密與憑證」→「安裝憑證」→ 選擇「CA 憑證」
  3. 點擊「仍要安裝」並選取剛下載的 anycert-ca.crt 檔案完成匯入。
Yes, absolutely! Mobile devices can fully trust AnyCert by installing anycert-ca.crt 🔒!

💡 Important Note on Mobile Connectivity (IP vs. FQDN):
  • Recommended: Connect via IP (https://<SERVER_IP>:xxxx): Non-rooted mobile devices cannot edit local hosts files. AnyCert includes server IPs in the certificate's SAN fields, so direct IP connections work securely without editing hosts!
  • To use FQDN domain names on mobile (https://<FQDN>:xxxx): You must configure a Local DNS A Record pointing to the server IP on your router or local DNS server (e.g. AdGuard Home, Pi-hole, OpenWrt).
📱 iOS / iPadOS Setup:
  1. Open http://<SERVER_IP>/ (AnyCert landing page) in Safari and tap Download Root CA.
  2. Go to iOS Settings → Profile Downloaded → Install.
  3. Crucial Step: Go to Settings → General → About → Certificate Trust Settings → Toggle Full Trust ON for AnyCert Root CA.
🤖 Android Setup:
  1. Open http://<SERVER_IP>/ in Chrome and download anycert-ca.crt.
  2. Go to Android Settings → Security & Privacy → More Security Settings → Encryption & Credentials → Install a Certificate → CA Certificate.
  3. Tap "Install Anyway" and select the downloaded anycert-ca.crt file.
一台用戶端可以同時信任多台 AnyCert 伺服器嗎? Can a single client machine trust multiple AnyCert servers?
完全可以! 每台 AnyCert 伺服器各自擁有獨立的 Root CA,用戶端腳本完整支援多台伺服器並存。

只需針對每台伺服器分別執行一次用戶端腳本:
anycert-windows.bat -s 192.168.1.10
anycert-windows.bat -s 192.168.1.20

每台伺服器的 CA 憑證會被獨立匯入並記錄於本地清單(%ProgramData%\anycert\anycert-info.txt)。下次不帶 -s 直接執行時,腳本會列出所有已登記的伺服器,讓您選擇「新增 / 移除 / 離開」。
Absolutely! Each AnyCert server has its own independent Root CA, and the client scripts fully support multiple servers coexisting on the same machine.

Simply run the client script once per server:
anycert-windows.bat -s 192.168.1.10
anycert-windows.bat -s 192.168.1.20

Each server's CA cert is imported separately and tracked in a local registry file (%ProgramData%\anycert\anycert-info.txt). When you run the client script again without -s, it lists all registered servers and lets you choose to Add, Remove, or Exit.


🌐 探索我們的內網 HTTPS 憑證工具箱 🌐 SSL/TLS Certificate Toolkits Ecosystem

點擊下方專案卡片可直接造訪各自的官方網站 Click any project card below to visit its official website

🔒
anycert
多服務旗艦版Multi-Service Suite

全功能多服務內網憑證工具箱,支援 Nginx SSL Proxy / Gateway / Custom Path 等 5 大 Profile 與一鍵 Nginx 反代配置。 Full-featured multi-service SSL toolkit supporting Nginx Reverse Proxy, Gateway, Custom Path & Generate-only modes.

造訪 anycert 官方網站Visit anycert Site
P
pve-cert
Proxmox VE 專用版Proxmox VE Edition

專為 Proxmox VE 7/8/9 節點原生 Web UI (:8006) 打造的一鍵專屬 Root CA 憑證簽發與跨平台自動信任工具。 Specialized 1-click local Root CA & SSL certificate toolkit for Proxmox VE 7/8/9 Web Console UI (:8006).

造訪 pve-cert 官方網站Visit pve-cert Site